Background: neutron transport, live moderator (C) absorber (Cd) fissile (U-235) fission productclick anywhere to inject neutrons
Monte Carlo Neutron Transport
VERITAS
Visual Explorer for Real vs. Idealized neutron Transport and Analytic Solutions
Pick a moderator, fire neutrons into it, watch them thermalize — then check the result against the analytic theory. Full OpenMC transport, no input decks to write.
Built for the Reactor Physics course at the University of Ljubljana, and usable for entry-level research or preliminary design studies. Everything below runs from the interface — no OpenMC scripting required.
01
Define the problem visually
Choose graphite, hydrogen, light or heavy water, or beryllium; set density, geometry (sphere, box, cylinder), and a point or planar neutron source with its energy, count and seed.
02
Run real transport
OpenMC executes in a containerized environment with live batch progress and a stop button. Track data is cached so every later plot draws instantly.
03
Inspect thirteen diagnostics
3D particle tracks, energy versus collision number, cross-section viewer, scattering angle and cosine distributions, mean free path, dN/dE and flux spectra, and time-dependent diffusion.
04
Compare against theory
Overlay the analytic results directly on the simulation: the 1/E slowing-down spectrum, the average logarithmic decrement ξ, maximum fractional energy loss 1−α, and the mean scattering cosine 2/3A.
05
Build idealized nuclides
The pydecs pipeline synthesizes pure scatterers, 1/v or step absorbers, and scatterers with absorption windows, then runs NJOY to produce valid ACE data — textbook physics with no real-world complications.
06
Export for reports
Every plot downloads as a static PNG or as an interactive HTML file that keeps zoom, pan and tooltips intact.
Inside the simulator
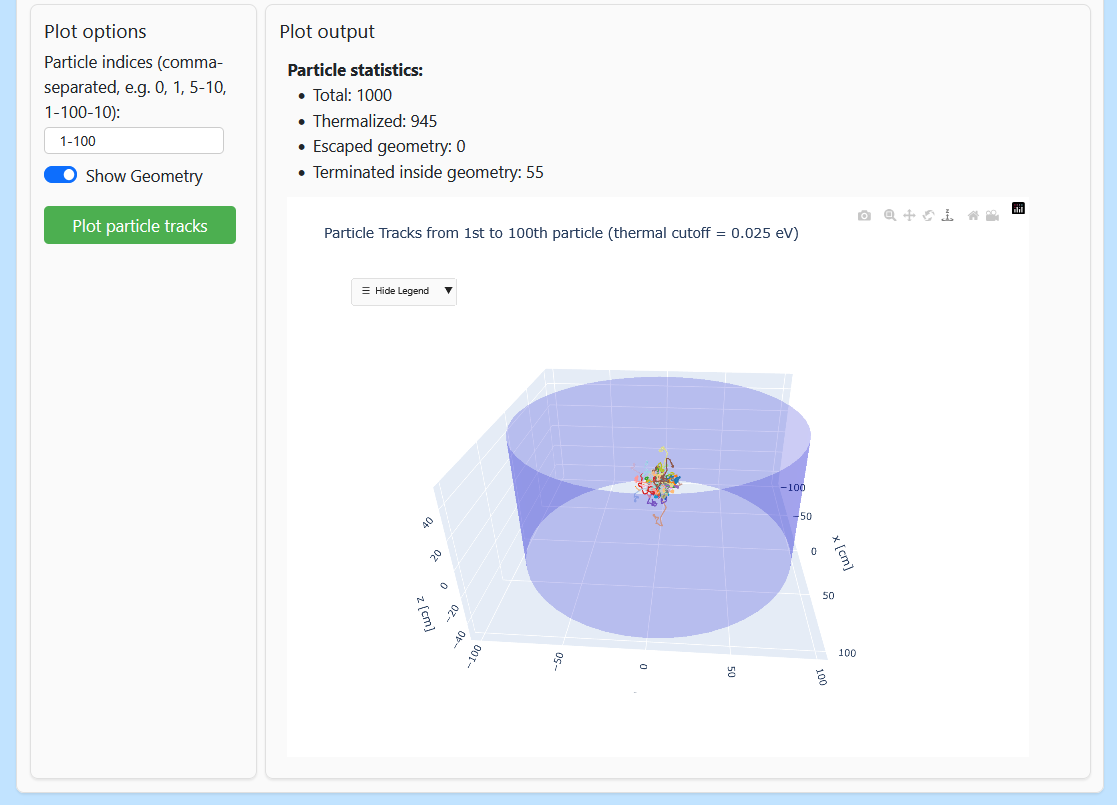
screenshots/particle_track.png 3D particle tracks
3D tracksNeutron trajectories inside the geometry, color-coded by energy, with per-history collision counts and final states in the legend.
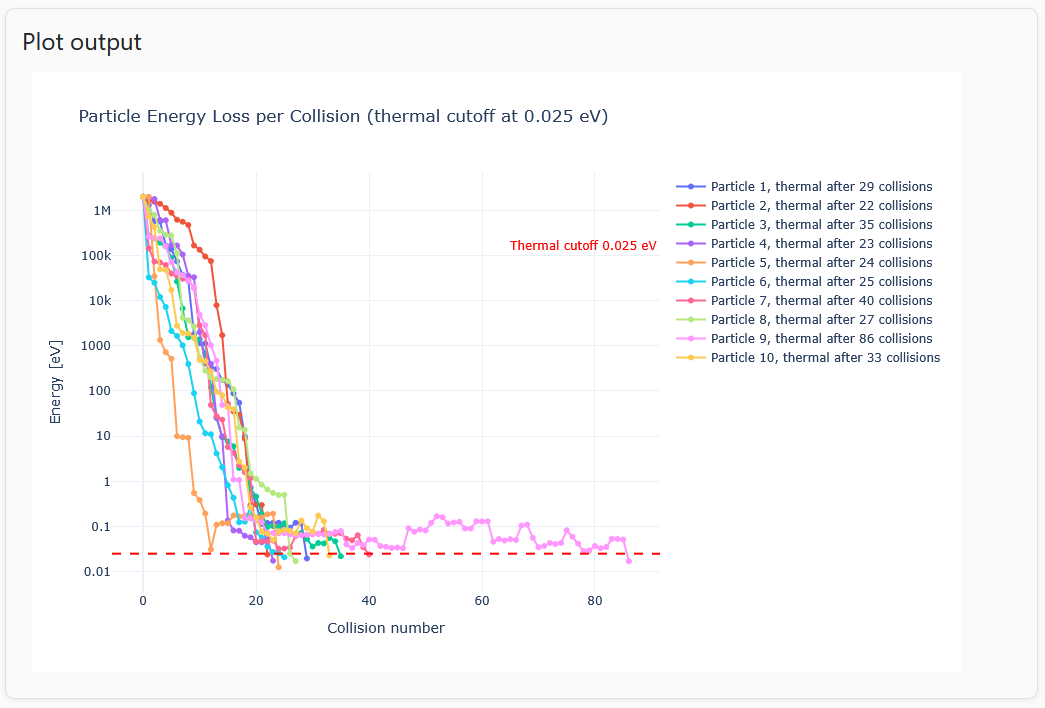
screenshots/energy_loss_plot.png Energy vs. collision number
Moderation curveEnergy degradation per scattering event, from the fast regime down to thermal equilibrium.
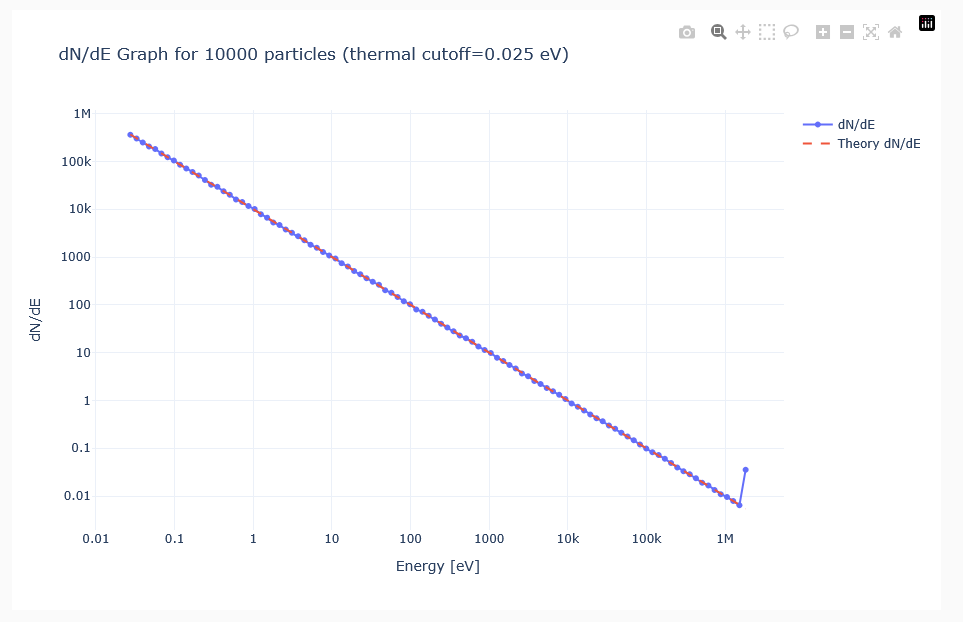
screenshots/dNdE_plot.png Neutron spectrum
SpectradN/dE and flux distributions on a lethargy axis, with the classical 1/E slowing-down model overlaid.
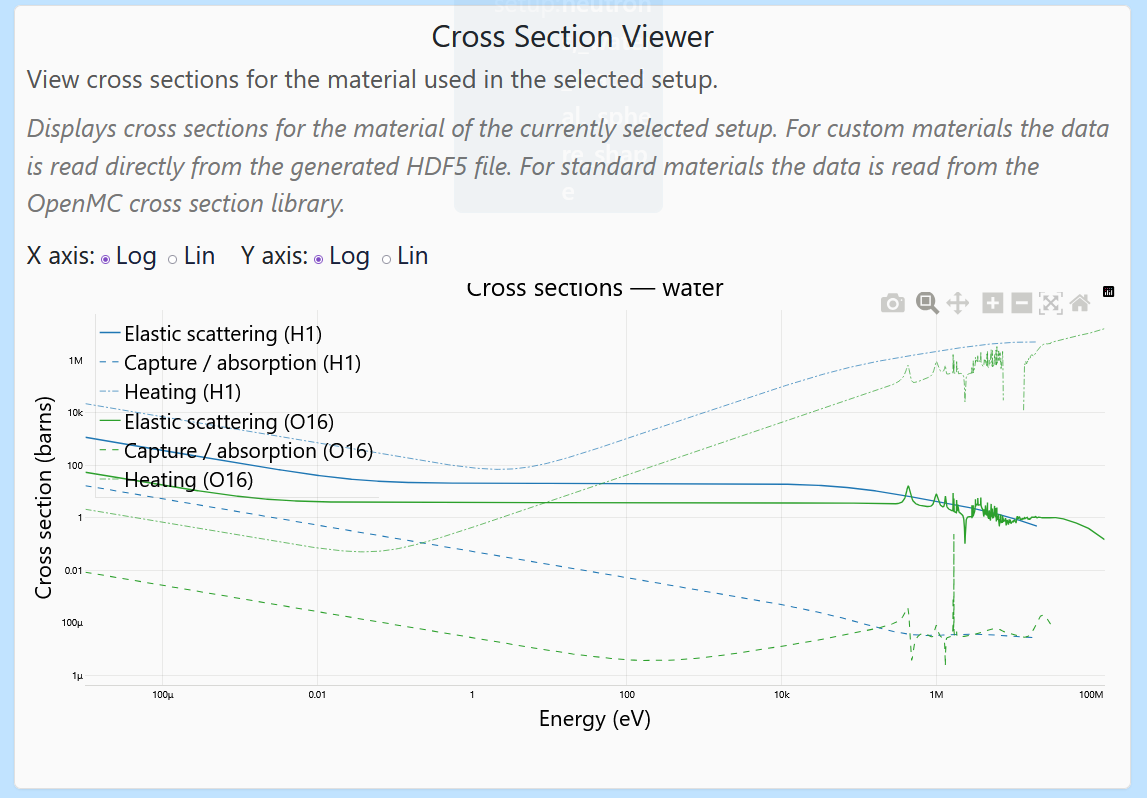
screenshots/example_xs.png Cross-section viewer
Cross-sectionsElastic, absorption, fission and heating cross-sections per nuclide — real ENDF data next to idealized pydecs profiles.
Before you start
A first install takes roughly 30 to 45 minutes, most of it downloads. Administrator rights are needed for WSL2 and Docker Desktop.
Windows 10 21H2 or Windows 1164-bit. A Linux build is coming soon.
8 GB minimum16 GB recommended for large runs
~8 GB1.3 GB app and container, plus 4.5 GB if you install the full library
Virtualization enabledIntel VT-x or AMD-V, set in BIOS/UEFI
●Disk budget: the app is 790 MB. The cross-section library is a 1.5 GB download that expands to 4.5 GB. It is optional — without it you can still run every idealized material generated by pydecs, and you can add the library later from the settings menu.
Installation Guide
01
Phase 1
Windows Subsystem for Linux (WSL2)
VERITAS runs compiled Linux binaries for the transport calculation. WSL2 provides the Linux kernel they need.
01.1Open Administrator Shell
Right-click PowerShell or Command Prompt and select Run as administrator.
01.2Run WSL Install Command
Enables the virtualization features, downloads the Linux kernel, and installs Ubuntu.
wsl --install
01.3Restart System
Restart when prompted to finalize the kernel installation.
⚠If a virtualization error appears — enter BIOS/UEFI and enable Intel VT-x or AMD-V before retrying.
02
Phase 2
Docker Desktop
The OpenMC engine, NJOY and the Python application ship as one Ubuntu 24.04 container image. Docker runs it.
02.1Download & Run Installer
Download from the official Docker Desktop website. Run Docker Desktop Installer.exe.
02.2Enable WSL2 Backend
During configuration, ensure "Use WSL 2 instead of Hyper-V (recommended)" is checked.
02.3Launch & Accept Agreement
After restart, open Docker Desktop from the Start menu and accept the service agreement. You do not need to keep it open afterwards — VERITAS starts it on demand.
03
Phase 3
VERITAS Setup Wizard
One installer configures the application, nuclear data, workspace storage and the container image.
03.1Choose Directory and Port
Run the VERITAS .exe. Select an installation directory (790 MB for the application binaries) and a local server port. The default is 8300; any free port from 1024 to 65535 works.
03.2Point to Nuclear Data
If you already have ENDF/B-VIII data, give the wizard the path to your cross_sections.xml. Otherwise download the minimal library (1.5 GB compressed, 4.5 GB on disk), or skip it entirely and work with idealized materials only — you can add the library later from the settings menu.
03.3Set Workspace & Quota
Choose where saved setups and generated materials live — by default /openmc_setups/local_user/ inside the install directory — and set a quota in MB to cap how much disk the cached track files may use.
03.4Container Deployment
The wizard runs a PowerShell script that registers the VERITAS image with your Docker daemon.
Loading payload: veritas.tar ──> Registering with Docker Daemon...
■Do not close the PowerShell window until it finishes. Closing it early leaves the image unregistered and the OpenMC engine unreachable.
04
Phase 4
Launching VERITAS
From here on, one double-click is the whole startup procedure.
04.1Double-click the Shortcut
VERITAS checks for Docker, starts it if needed, initializes the container and opens a loading screen in your browser.
04.2Wait for the Dashboard
The loading screen polls the local server and redirects to the simulator once it is ready. First launch takes longer than later ones.
04.3Adjust Settings if Needed
The settings modal in the header changes font size, storage quota, port and library paths. Port and path changes take effect after a restart. Use absolute Windows paths, for example C:\VERITAS\Crosssections\cross_sections.xml.
Staying current
Updates install themselves
At every launch VERITAS compares your local settings.json against the version manifest on this site. If a newer release exists, it shows a progress screen, pulls the updated container image, swaps it for the old one and continues into the application. Nothing to download by hand.
Automatic updates can be switched off during installation or later in the settings menu. Uninstalling through unins000.exe removes the binaries and the Docker image, and asks whether to keep your saved setups and custom materials.
Pick another port in the settings menu — anything free from 1024 to 65535 — and restart the application. To see what holds the port: netstat -ano | findstr :8300.
Docker daemon not running, or the engine is unreachable
VERITAS normally starts Docker itself. If it cannot, open Docker Desktop and wait until the whale icon stops animating, then check with docker info. If the image is missing entirely, the deployment step was interrupted — re-run the installer to restore it.
Virtualization is disabled (VT-x / AMD-V)
Enable Intel VT-x or AMD-V in BIOS/UEFI; it is sometimes labelled SVM Mode. On managed laptops, Hyper-V or Credential Guard may also need to be turned off by IT.
Cross-section library not found
The path must be absolute and point at the file itself, not its folder: C:\VERITAS\Crosssections\cross_sections.xml. Repoint it in the settings menu and restart — no reinstall needed.
The simulation runs but no tracks appear
Select the finished setup in the Setups dropdown before plotting; without an active selection VERITAS will not generate graphs. If tracks are truncated instead of missing, the maximum file size is capping the run — raise the quota or lower the particle count.
The 3D track view is slow or unresponsive
Rendering is limited by your graphics hardware. Keep it under roughly 100 particles at once, especially with the geometry overlay enabled or in a material with high collision counts. The default is 10.
Results disagree with the theoretical overlay below 1 eV
Expected. The analytic slowing-down models assume a stationary target nucleus and ignore thermal up-scattering, which becomes significant below about 1 eV. Raise the thermal cutoff above 1 eV, or disable up-scattering in the ξ comparison, and the two converge.
NJOY fails when generating a custom material
Check that the atomic weight, temperature and maximum energy are all set, and that absorption windows are given as comma-separated E_min, E_max, sigma triples within the evaluation range. Reusing an existing name prompts you to overwrite or create an incremented version.
How to cite
If VERITAS contributed to your coursework, thesis or publication, please cite the report.
J. Kokot and L. Snoj, VERITAS: Visual Explorer for Real vs. Idealized neutron Transport and Analytic Solutions. Jozef Stefan Institute, 2026.